Showing posts with label DIY. Show all posts

Monday, August 24, 2015

Coffee Table Makeover

Today is the first day of school for us.I was able to finish one of my favorite projects last week just in time for school to start.


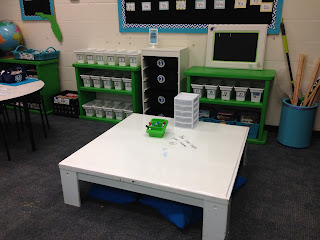
I had this old square coffee table that I painted for my room last year. By the end of the year, it needed to be refreshed. My husband had the wonderful idea of covering it with a white bord from Home Depot. Here is what it looked like at the end of last school year:

Home Depot cut a sheet of white board into a 45 inch square. I attached it with Power Grab glue and put white duct tape around the edges of the table. Here it is now:


I let the children write their names on the table at Meet the Teacher night.


One of the best parts about this project was that the white board sheet was $14 and I have a large enough piece left that I can recover the table next year if it gets messed up for some reason.

Now, I'm off for a busy first week of school. 


Monday, August 17, 2015

Monday Made It

 Monday Made It


I filled bags with goldfish crackers and attached this tag. I am going to have these on the students' desks for Meet the Teacher this Tuesday. I found the free printable on firstgradeblueskies.com.


I had a basket in this spot on my classroom counter. But, the more I thought about it, I decided that I want to have the students help sort the papers. There is a space for Homework, Math (for 2 different classes) and Science. I used a scrapbooking shelf unit I had at home and printed labels for each shelf. I think this will help me keep the papers better organized this year.


This was a small bamboo hamper I no longer used at home. I removed the top and painted it turquoise to match my room. I hot glued ribbon around the top and bottom. I am using it in my classroom to hold various items such as yard sticks, a broom and rolls of paper.


I had this stool in my class for last couple of years. I painted it to match that classroom. It didn't match my new room, so I painted it black. I was planning to paint a design on it, but I haven't decided what I want to paint. So, for now, it is black and blends in better with this room.


I made this plaque for the house. I printed out a quote I like on photo paper. I painted a wood shape navy blue. Then, I mod podged the quote on the wood. I attached a hanger on the back.

I go back to work this week, so I'm not sure if I will be able to make things this week, but I hope so. It is very relaxing to be crafty! 


Monday, August 3, 2015

Monday Made It


I am excited to link up with 4th Grade Frolics again for "Monday Made It".
 Monday Made It


I hung these in my class computer area. The sign that says "computers" is a recycled wood picture. The larger piece is a 10"x14" canvas. The 2 smaller pieces are cardboard shapes I got from Hobby Lobby. I painted all of them with chalkboard paint. I glued on labels from Schoolgirl Style and added 2 tissue paper flowers, ribbon and clothespins. I am going to hang the daily computer schedules on the signs.


The picture is from Schoolgirl Style. I mod podged it onto a canvas that I painted turquoise. I hung this on a cabinet in my class.


I found this "friends" cardboard sign at Hobby Lobby. I painted it turquoise and hung it above the sink area in my class. I painted a canvas and glued clothespins on it. I plan to hang pictures of the children in the class on the canvas throughout the year.


I made the "Class Jobs" sign by gluing a cardstock paper onto a cardboard shape i got from Hobby Lobby.


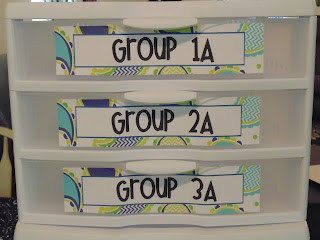
I am going to use these drawers to help organize my Guided Math groups. I found 3-drawer bins that are larger than the others I have. They hold scrapbook paper so they are about 12" x 12". I think the larger size will be better since I like to keep manipulatives and other materials together with papers I need for each group.


Since I will teach Math to 2 different blocks of students, I got two bins (one for each group). They can stack together.


Friday, July 31, 2015

5 for Friday


fiveforfriday2_thumb[3]

Divider 1


I am still busy making things and organizing my new classroom. This week, I made a "No Names" holder for papers that don't have names on them. The white board is actually the front plate of a drawer that we pulled out when we remodeled. The "No" and "Names" labels are printed from a Schoolgirl Style set. I used 1 inch blue ribbon around the edges and I got the blue chevron clothespins from Walmart.

Divider 2


This is a small metal table that I have had forever. It was done in shades of brown and orange. I spray painted it an aqua color and I am going to see if I have a spot I can use it in my classroom.
Divider 3


I went up to my classroom this week to work on labeling things. I organized my books and got the labels on the bins. I have most of the Math manipulatives labeled also.

Divider 4

As I organize my classroom, I have been making labels to go along with my manipulatives. I finished them this week and posted them on Teachers Pay Teachers. I made them in four different chevron colors: turquoise, lime green, blue and gray.


Turquoise Chevron Math Labels
Turquoise Chevron here

Lime Green Chevron Math Labels
Lime Green Chevron here

Gray Chevron Math Labels
Gray Chevron here

Blue Chevron Math Labels
Blue Chevron here


Divider 5


I have also been researching my family's geneology since my mother died in 2013. She had started the research in the year before she died and I want to finish it for her and our family. This week, I finished making notebooks for one of the lines. I put the line of ancestors in the front and some information about each person. It has been very interesting.


Monday, July 27, 2015

Monday Made It

Like most teachers, I have been busy making things for my classroom. Here are some of my "Made It"s.

Made It #1

Here is a picture of a chalkboard  I made for my Centers in my classroom.


I made two of them. They are made from a cabinet door. We recently remodeled our kitchen and I kept the cabinet doors.
To make the chalkboard, I painted the middle part with black chalkboard paint.

My cabinet door was already white. I  hot glued lime green ribbon (hard to see in the picture) where the black chalkboard paint met the white of the cabinet door to create a nice straight line. I also hot glued 2 clothespins to use if I want to hang a paper.


I removed the handle and hot glued some paisley pictures from the Schoolgirl Style set I bought. 
This hid the holes left after I removed the handle.


Made It #2

I bought a small child's toy box/bench at Goodwill last year for $4. It had been painted black. I wanted to give it a makeover to match my classroom. First, I put primer on it.


Then, I painted it lime green.

I painted the top of each post turquoise. Then, I glued a thick piece of foam to the top (recycled from another project). I covered the foam in fabric and stapled the fabric under the top.

I hot glued ribbon along the front and sides.


Made It #3


This is one of the Student Mailboxes I have had for years from Really Good Stuff. It was a dark green color on the outside. Since I am focusing more on lime green and turquoise in my classroom, I wanted to change it. I painted the outside lime green.


I hot glued a white border around the edges and a ribbon on top. I glued the words "Kids' Mail" to the top.


Here they are both together.


Blogging tips